|
Arming the System
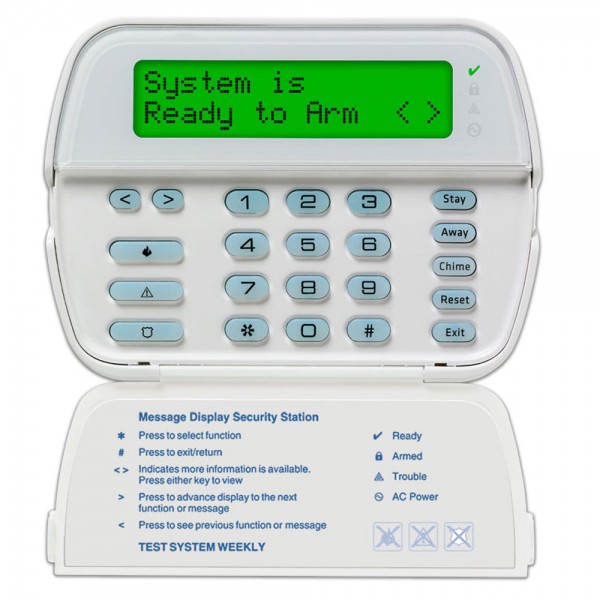
To arm your DSC security system, enter your 4-digit code followed by an arming option:
- Stay Mode: Press [CODE] + [3]. Arms perimeter zones; interior bypassed for staying home.
- Away Mode: Press [CODE] + [2]. Arms all zones (perimeter and interior) when leaving.
The "Armed" light turns on, and an exit delay (e.g., 30-60 seconds) starts. Exit before it ends; the last 10 seconds flash rapidly.
|
Disarming the System
To disarm:
- Enter your 4-digit code + [1] (OFF).
- The "Armed" light turns off, and any entry tone stops.
- If "Armed" flashes during entry, an alarm occurred—exit and contact your alarm company.
Disarm within the entry delay to avoid triggering the alarm.
|
Arming Modes Breakdown
- Stay: Perimeter protection only; interior zones off. Use when staying inside.
- Away: Full protection; all sensors active. Use when leaving the premises.
Keypad displays "System Armed Stay" or "System Armed Away" accordingly.
|
Quick Arm Instructions
If enabled, arm without a code:
- Press [*][0] for Away mode.
- Press [STAY] key (if available) for Stay mode.
- Disarming requires a valid code.
Confirm with your installer if Quick Arm is activated.
|
Bypassing Zones
To bypass a zone while disarmed:
- Press [*][6], enter your code, then the 2-digit zone number (e.g., [0][5] for zone 5).
- Press [#]. "Bypass" light shows, and the zone is excluded when armed.
- Bypasses reset upon disarming.
Caution: Bypassing weakens security, especially entry/exit zones in Away mode.
|
Enabling Chime
To toggle chime (alerts for zone openings when disarmed):
- Press [*][4] or hold [CHIME] (if available).
- "Chime On" displays when active; repeat to turn off.
- Produces a tone when doors/windows open.
Useful for monitoring activity without arming.
|
Changing Codes
To change a user code (master code required):
- Press [*][5], enter [master code].
- Enter 2-digit user number (e.g., [0][2] for user 2).
- Enter new 4-digit code, then [#].
- To delete, press [*][5][master code][user number][*][#].
Test new codes to ensure they work.
|
Reviewing Faults
To view faults:
- If "Ready" light is off, press [*][2] to enter Trouble Menu.
- See trouble codes (below) and press the number for details.
- Fix or bypass, then press [#] to exit.
Addresses issues preventing arming.
|
Trouble Codes Explained
When the yellow triangle "Trouble" light is on and beeping occurs, press [*][2] to view codes (1-8):
- 1 - Service Required: Press [1] for sub-menu:
- 1: Low Battery - Main panel battery <11.5V; replace (typically 12V 7Ah).
- 2: Bell Circuit - Siren wiring issue; contact installer.
- 3: General Trouble - System fault; service needed.
- 4: General Tamper - Panel tamper switch triggered.
- 5: Module Supervision - Keypad/module lost; check connections.
- 6: RF Jam - Wireless interference detected.
- 7: PC5204 Low Battery - Power supply battery low.
- 8: PC5204 AC Failure - Power supply lost AC.
- 2 - AC Loss: No power to panel; check transformer/circuit breaker.
- 3 - Telephone Line Fault: Phone line down; test dial tone.
- 4 - Communication Failure: Failed to reach monitoring station; test signal.
- 5 - Zone Fault: Press [5] to see faulty zone (e.g., open door).
- 6 - Zone Tamper: Press [6] for tampered zone (e.g., sensor cover off).
- 7 - Wireless Device Low Battery: Press [7] for device (e.g., sensor battery low).
- 8 - Loss of Time/Date: Reset via [*][6][master code][1], enter time/date.
Press [#] to silence beeping and exit. Most issues (except #8) require professional service if persistent.
|
Bypassing Effectiveness & Cautions
Bypassing allows arming but compromises security:
- Bypassed zones are unprotected, risking undetected entry.
- Avoid bypassing entry/exit zones in Away mode, as it defeats perimeter security when away.
- Use sparingly; fix faults promptly via your installer.
- Test monthly: Arm, trigger a zone, disarm (notify monitoring first).
|